Friday, 24 April 2020

Pioneer Squid & Erica Synths trigger module


The erica Midi to Trigger is a very cool module.
Simple controls ... just one program button.

I'm using it with my Pioneer Toraz Squid.
These settings are my personal ones, though you can use whatever midi notes & channels you wish.


My setup.
Each of the 8 drum tracks transmits data on Midi 1, Channel 1 .
(just mute tracks 9 - 16)


trig1 - c4
trig2 - d4
trig3 - e4
trig4 - f4
trig 5 - g4
trig 6 - a4
trig 7 - b4
trig 8 - c5

To program the module
1. Set up the Squid as above.
2. Press the Program button on the Erica module for 2 seconds
3. LED 1 will light up
4. on track 1 (Squid) press a trigger pad firmly.
5. LED 2 will light up
6. On track 2 (Squid) press a trigger pad firmly.
7. LED 3 should now light up.
8. Continue this until all the 8 triggers are programmed.


Monday, 20 April 2020

Combining two Korg SQ-10 sequencers

This is a really interesting way to generate tunes.
It uses the mathematical idea of Lowest Common Multiples (LCM).

The idea for this patch & video came from a fellow You Tuber, Mike Olson.
He posted a cool video showing how to use a single Korg SQ-1 to make a sequence longer than 16 notes.
https://youtu.be/JYTCQ1zrtvc

Mike demonstrated how by combining two 8 step sequencers, he could generate a miriad of patterns on the fly with final step lengths ranging between 1 & 56

I decided to replicate this patch using two old Korg SQ-10 sequencers.


They have a maximum sequence length of 12. However, by combining two, one can achieve a large range of step numbers ... between 1 & 132
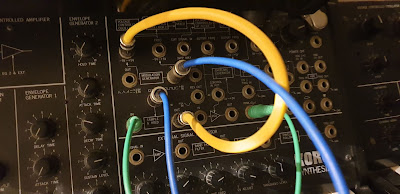
The control voltage out of the two sequencers is added before it enters the synth (a Korg MS-20 in this case).

 And the MS-20's envelope is triggered every step on the sequence.


I've drawn up a new table (16 x 16).


Please excuse my very rough handwriting. The top horizontal row and the left vertical row are the sequencers. They are related to one another via the grid. Their intersection is the LCM.

The relationship between the two initial step lengths (sequence A + Sequence B) and the final  Sequence length uses the mathematical principle of Lowest Common Multiples.
The final sequence length is the LCM of the two initial step lengths (sequence A + Sequence B).

You should be able to replicate this with any two sequencers.
 ---------------------------------------
eg:
What is the LCM of 4 & 7?
      
Multiples of 4 are:
4, 8, 12, 16, 20, 24, 28, 32,36,40, 44, 48, 52, 56, 60, 64, 68, 72..... etc
Multiples of 7 are:
7, 14, 21, 28, 35, 42, 49, 56, 63, 70, 77, etc
Common multiples of 4 and 7 are the numbers that are in both lists:
28, 56..... So, from this list of the first two common multiples of the numbers 4 and 7, their lowest common multiple is 28.
---------------------------------------------------------

Hopefully this wasn't too geeky and you've made it to the end of the post without falling asleep.
:-)
All this is a perfect demonstration of the close relationship between mathematics & music.
I think this is a cool way to discover new melodies.
It would be neat to see how the addition of two more sequencers  would add to this complexity.


Better Audio:


Monday, 13 April 2020

Korg MS 20 - Favourite Patches

These are some of my favorite Ms 20 patches.

Basic Bell 


MG ramp out ------> trig in


-------------------------
Basic Bass
iT'S  a variation on the bell patch, above.
So the knob settings are the same.

But the patch panel changes the sound.
The output of EG 1 ------> initial gain (VCA)
Mod wheel ------------> HP filter cutoff.


If you are using a SQ 10 to sequence,
Multiple Trigger ----> trigger in
CV C  -----------------> CV in
-------------------------------------------------------------------------------------------------------

Bass patch 2
A closeup.
Requires no patch-cables


---------------------------------------------------------------------------------

Lead 1
No patch chords


-------------------------------------------------------------------------------------------

Lead 2


Variation 2

--------------------------------------------------------
lead 3


---------------------------------
ARP (Sample & Hold 1)

MG -----> clock 1
Pink noise ---------->S & H input
S & H out ---------------> HP cutoff
variation 2
S & H out ---------------> total in

-----------------------------------------------------------------------------------

ARP 2
No patch cables


Variation 2
The output of the MG ---------> Total in.
----------------------------------------

Sunday, 12 April 2020

Roland Tr 909 - Drum Mapping

The Roland TR 909 hails from 1984 and is one of the earliest drums with MIDI.
However, there is very sparce information as to its level of MIDI implementation.


The rear of the machine has one midi out & two midi in terminals.

Initially, I thought only midi clocking was possible,
however after  purchasing a Pioneer Squid I attempted to map the two machines properly.
(Thanks to Mitch for his advice on this).

Though I love the 909's sequencer, and must admit, it is one of the strengths of this machine, the Pioneer Squid has a quite inspiring system for groove & melody creation. It would be cool to combine the two.
So the aim is  to trigger the individual sounds of the old 909 via midi from the Squid.

Looking at the 909's manual doesn't show much detail on the 909s note on/off implementation.
However, this section gives us a clue.
Seems that the default input midi channel  is 10, but this can be changed to any of the 16 channels.
Also, note numbers start at 35, and end at 51. (that is, B1 to D#3)


The service Manual, throws a little more light on the subject.


 Below, is the GM standard Drum Map
The Roland, Tr 909 follows this pretty closely.

The 909's drum map uses just one (user selectable) mid channel & the
individual voices are mapped to17 notes.  They are:

35 - B1 - Bass Drum
36 - C2 - Bass Drum 2
37-  C#2  - Rim Shot
38 - D2 - Snare Drum
39 - D#2 - Hand Clap
40 - E2 - Snare Drum
41 - F2 - Low Tom
42 - F#2 - Closed High Hat
43 - G2 - Low Tom
44 - G#2 - Closed High Hat
45 - A2 - Mid Tom
46 - A#2 - Open High Hat
47 - B2 - Mid Tom
48 - C3 - High Tom
49 - C#3 - Crash Cymbal
50 - D3 - High Tom
51 - D#3 - Ride Cymbal

This will only work when the drum is stopped, and in Track Play Mode.
The Tempo Mode should be set to MIDI.
You should also select a blank track or the patterns that are programmed in that track
will be forced to run whenever a START command is received from MIDI IN.

Use the following procedure to set the MIDI receive channel:
a) Start her up while pressing the shuffle key.
b) When the drum has powered on press the shuffle again whilst pressing the step number (1-16) corresponding to MIDI channel of course.

In Abelton these are the notes that trigger the 909


01 - B0 - Bass Drum
02 - C1 - Bass Drum 2

03 - D1 - Snare Drum
04 - E1 - Snare Drum

05 - F1 - Low Tom
06 - G1 - Low Tom
07 - A1 - Mid Tom
08 - B1 - Mid Tom
09 - C2 - High Tom
10 - D2 - High Tom

37-  C#1  - Rim Shot  *** use this for your clock/trigger out****
39 - D#1 - Hand Clap

13 - F#1 - Closed High Hat
14 - G#1 - Closed High Hat
13&14 - A#1 - Open High Hat

15 - C#2 - Crash Cymbal
16 - D#2 - Ride Cymbal

-----------------
Note many modern Drum machines use different form of Midi mapping.
For example. the Pioneer SP 16 & Korg Volcas map each voice to a separate midi channel.

+ TR 909 Drum
        + Roland TR 909 Programming Tutorial - getting started
        + Roland TR 909 - How to Program

Saturday, 11 April 2020

Roland TR 909 - How to Program

A classic drum, but programming her can be challenging if you're new to it.
Here's a in depth guide on how to program drum patterns on the TR- 909.

Check out the quick start guide here:
+ Roland TR 909 Programming Tutorial - getting started


 When you first turn on your 909 you will enter TRACK MODE
The drum will look something like this:
You won't be able to run the sequencer, but if you just hit any of the 1-16 buttons, you will hear the sounds.  ..... Enjoy !!!!

Like the Roland Tr 606 & TB303, the 909 drum memory can be divided into Tracks & Patterns.
The 3 pattern groups can store 16 patterns each (16x3=48).
There are 2 banks of these groups (2x48=96)
So it can store up to 98 patterns.
These patterns can be arranged into 8 tracks. (2 banks of 4 track groups).

---------------------------------------------------------------------------------------------

1. Clearing Patterns (Pattern Write Mode)
2. Step Recording (Pattern Write Mode)
3. Real time (Tap) recording (Pattern Write Mode)
4. Shuffle / Swing
5. Sync Mode
6. Scale
7. Track Play mode
8. Track Write mode (deleting tracks)
9. MIDI

1. Clearing Patterns.
    It always good to start with a blank slate. If you have just purchased a 909 (congratulations)
     ... it will probably have some old patterns already programmed into the memory.
    a) Put the TR-909 into Pattern Write Mode.
        Press Shift + one of the Pattern Play buttons.
     b)  Press Shift button + press the Step Tempo button.
     c)  Hold the Clear button + press 1-16 on the main buttons to select the pattern to clear.


        If you now press play (on the external sequencer or the internal 909's sequencer), you won't hear
        anything, though you will see the sequencer lights running across the 16 steps.

2. Step Recording
There are two types of recording:
+ Step Recording
+ Real time (Tap) recording

Step, is I think the easier of the two.
a) Put the TR-909 into Pattern Write Mode
     * Hold Shift & one of the Pattern Play buttons.
 b) Select your instrument by holding down the Instrument Select button
             and pressing one of the 1- 16 buttons.
 c)  Press Start ( the drum will run) Now add your beats by pressing buttons 1-16.
 d)  repeat this till you have picked your voices.

    You accent the drums by hitting the buttons twice.


3. Real time (Tap) recording 
   You can combine the two methods of programming.
    I like to start programming in Step mode then add extras using TAP.
    a) press Shift + Tap (in the Pattern Write Mode section).
    b) To hear the metronome press the "Guide button" and you will hear the click when Start is pressed.
    c) Use buttons 1-16 to program your new rhythm or embellish your already existing pattern.

Note:
The 909 will quantise your beats.
Pressing the 1-16 buttons more than once will make them sound louder.


4. Shuffle/Flam
     To adjust the shuffle, you press  Shuffle/flam and one of the buttons 1 to 7.
     You can back it off a bit by going back to 4 or 5...


    Flam uses the buttons 9 to 16.
    Flam is like a ratchet double hit


5. Sync Mode
    a. Shift + Tempo Mode (Din sync, Midi, or Internal)
        You need to tap the Tempo mode button till the display shows either
         a "0" in the left (Din), a "0" in the middle (MIDI) or the BPM on the right (eg 120)


6. Scale
You can change the time signatures, but hitting scale.

Scale changes the sub division of the pattern.


7. Track Play
a) press Shift + Bank (I or II)
b) Now, select a track to play
     Press  Track Play (1,2,3,4)
c) Press start (to play the existing track)
d)  Press Stop


8. Track Write

To Delete an existing track
a) press Shift + Bank (I or II)
b) Now, select a track to edit
     Press  Shift + Track Write (1,2,3,4)
c) to delete a track press
     Shift + button 1-16
     While still holding shift press Enter.
      While still holding shift   Press DEL (under button 13)
      While still holding shift press LAST MEAS (last measure)
      While still holding shift press Enter
      Hit START to check that the track is now empty.

To Write a new track 
(assuming the track is empty, otherwise delete as above)
a) press Shift + Bank (I or II)
b) Now, select a track to edit
     Press  Shift + Track Write (1,2,3,4)
c) hit START
d) press pattern group (1,2,or 3) + pattern number 1-16
e) press Enter
f) repeat steps (d) & (e) until you have finished picking the patterns.
g) press STOP (that's it)


Friday, 10 April 2020

Hoi Ann - night pics

I posted some pics of Hoi Ann during the day here:
https://djjondent.blogspot.com/2020/04/hoi-vietnam-day-pics.html

But it's at night when it's true beauty is displayed.


The waterfront is the place to be.


For more travel postcards click here: