
1. The mode switch needs to be set like this:

There are 64 possible memory locations.
 ..
..
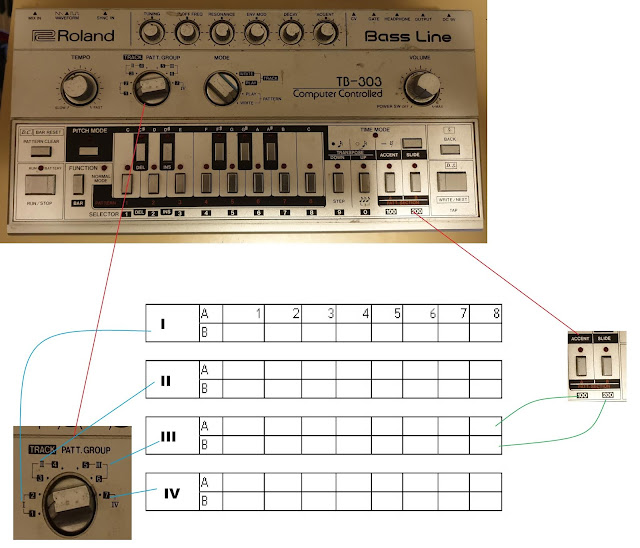
There are 3 sets of switches you will use to select the memory location.
A. The Track Patt.Group switch.
B. The pattern select switches (numbered 1 to 8)
C. The accent/slide button. These double up as A/B memory switches

3. If there is already a pattern in your chosen spot, hold "pattern clear" & then
press the appropriate "Pattern select" button (1 to 8)
This clears all data in that cell and resets the STEP to 4/4, 16 steps.

In order to write the pattern, the 303 needs two basic things:
Note information, and timing information.
This is done by entering the Pitch mode & the Time mode of the Baseline.
There are actually 3 modes
A. Pitch Mode (this is our note information mode)
B. Time mode (This is our time info)
C. Normal Mode (This is the standby/play mode, step number mode & time signature mode)

5. Go into Pitch mode first.
Press the "pitch mode" button , then type in your notes using the "keyboard".
6. Press the Function button.
The 303 is now in "Normal Mode".
(If you try to RUN the synth now, nothing will happen until you set the "time mode")
7. While you are in Normal Mode, you can set the pattern length & time signature (ie 3/4 or 4/4 time).
I think it's better to set the time signature 1st as this will determine the max number of steps in
your pattern.
(7.a) Time Signature
When the transpose up LED lights up, the STEP is in 3/4, 12 steps.
When the transpose up LED is off, the STEP is in 4/4, 16 steps.
(holding "pattern clear + buttons 1-8 will reset to 4/4, 16 steps).

Use the step (whole note) button.
If your time signature is 3/4, you will have a max of 12.
If your signature is 4/4, your max number of notes is 16.

8. Press the "time mode" button. The indicator LED will light up.
This section will write the length of each note.

16th notes ... semi quavers

Tied note.
It sustains the last pitch. Of course you can't add this after a rest

Rest. (silence)
Of course you can not play this on an ACCENT or a SLIDE

Each time you press one of these 3 buttons, the sequencer will automatically advance to the next step.
When you reach the last STEP in the pattern, the sequencer automatically returns to NORMAL MODE.
9. Now lets add some accents, transpositions & slides.
This is done in PITCH MODE. (You could of course do this in step 5).
You need to hold down the WRITE/NEXT button when choosing one of these.
If you push the WRITE/NEXT button without without touching any of the 4 buttons
the sequencer won't make any alterations to the last note.

Note that a tie, is not the same as a slide.
The difference is that a slide is a smooth change from one note to a different note, whereas a tie will hold the same note for two or more steps.
10. As the 303 is running you can finally change the timing of the notes (n real time).
Use the same WRITE/NEXT button. .... It's also called TAP

11. Change the Mode switch from "WRITE" to "PLAY" so you can't accidently overwrite your pattern.

12. Press RUN
----------------------------------------
I'll update these notes over time.
Do let me know if there are any mistakes, or omissions.
Cheers jono
No comments:
Post a Comment