Wednesday, 12 February 2020

Programming a Roland TB-303 - Part 2 - Pattern Write Mode

In order to write your first baseline first make sure you are in Pattern Write Mode.
1. The mode switch  needs to be set like this:
2. Choose where you want to store the pattern.
     There are 64 possible memory locations.
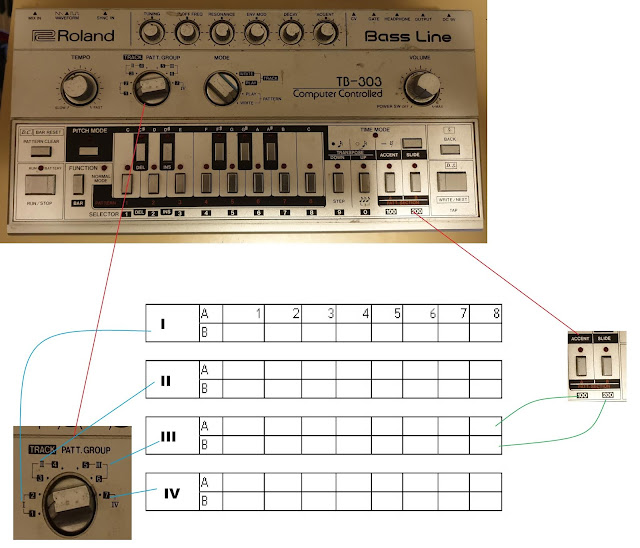
..
There are 3 sets of switches you will use to select the memory location.
A. The Track Patt.Group switch.
B. The pattern select switches (numbered 1 to 8)
C. The accent/slide button. These double up as A/B memory switches


3. If there is already a pattern in your chosen spot, hold "pattern clear" & then
    press the appropriate "Pattern select" button (1 to 8)
   
    This clears all data in that cell and resets the STEP to 4/4, 16 steps.
4. You can now write a pattern.
     In order to write the pattern, the 303 needs two basic things:
     Note information, and timing information.
     This is done by entering the Pitch mode & the Time mode of the Baseline.

     There are actually 3 modes
     A. Pitch Mode (this is our note information mode)
     B. Time mode (This is our time info)
     C. Normal Mode (This is the standby/play mode, step number mode & time signature mode)


5. Go into Pitch mode first.
    Press the "pitch mode" button , then type in your notes using the "keyboard".

6. Press the Function button.
     The 303 is now in "Normal Mode".
    (If you try to RUN the synth now, nothing will happen until you set the "time mode")

7. While you are in Normal Mode, you can set the pattern length &  time signature (ie 3/4 or 4/4 time).
     I think it's better to set the time signature 1st as this will determine the max number of steps in
     your pattern.

(7.a) Time Signature
    When the transpose up LED lights up, the STEP is in 3/4, 12 steps.
    When the transpose up LED is off, the STEP is in 4/4, 16 steps.
    (holding "pattern clear + buttons 1-8 will reset to 4/4, 16 steps).


7.b     Pattern Length.
          Use the step (whole note) button.
          If your time signature is 3/4, you will have a max of 12.
          If your signature is 4/4, your max number of notes is 16.
   

8. Press the "time mode" button. The indicator LED will light up.
    This section will write the length of each note.
The 3 buttons below "Down", "Up" and "accent" double up as the timing button for each note.

16th notes ... semi quavers

 Tied note.
 It sustains the last pitch. Of course you can't add this after a rest


Rest. (silence)
Of course you can not play this on an ACCENT or a SLIDE

Each time you press one of these 3 buttons, the sequencer will automatically advance to the next step.
When you reach the last STEP in the pattern, the sequencer automatically returns to NORMAL MODE.

9. Now lets add some accents, transpositions & slides.
    This is done in PITCH MODE. (You could of course do this in step 5).
    You need to hold down the WRITE/NEXT button when choosing one of these.
    If you push the  WRITE/NEXT button without without touching any of the 4 buttons
    the sequencer won't make any alterations to the last note.

Note that a tie, is not the same as a slide.
The difference is that a slide is a smooth change from one note to a different note, whereas a tie will hold the same note for two or more steps.


10. As the 303 is running you can finally change the timing of the notes (n real time).
      Use the same WRITE/NEXT button. .... It's also called TAP


11. Change the Mode switch from "WRITE" to "PLAY" so you can't accidently overwrite your pattern.


12. Press RUN

----------------------------------------
I'll update these notes over time.
Do let me know if there are any mistakes, or omissions.
Cheers jono

Programming a Roland TB-303 - Part 3 - Track Write Mode

Most of the time I use the Pattern Write Mode when playing live.
I like to switch patterns on the fly.
However, sometimes its good to arrange a full song, made up of patterns joined together.

This is where Track Write Mode is handy.
You can also pitch shift the patterns in this mode.

1. Go to Write Mode in the track section.


2. Press Pattern Clear/ Bar reset
    This takes it back to the start of the pattern

3. Press RUN
    This starts the sequencer

4. Press the first pattern you wish to play.

5. Hit NEXT

6. Press the next pattern button. Then hit NEXT.
    Keep on doing this till you are happy with the pattern arrangement.

7. Press Pattern Clear/ Bar reset
    This tells the 303 that you have finished choosing patterns.

8. Hit NEXT.

9. Pattern clear/ Bar Reset.

10. Run / start

--------------------------------------------
 Pitch Shifting your patterns.
 This is all done while the sequencer is running.

1.  Select the first pattern you wish to pitch shift.
     Press RUN.

2. While it is playing press PITCH MODE and "C" (button 8)
     if you want to pitch shift up one octave.
     You can of course pitch shift up a semitone, or two etc etc.
     Just press the appropriate key on the keyboard.


3. Next

4.  Repeat steps 1,2,3. till you are happy.

5. Pattern clear/ Bar Reset.

6. Next

7. Pattern clear/ Bar Reset.

8. Run


----------------------------------------
I'll update these notes over time.
Do let me know if there are any mistakes, or omissions.
Cheers jono


Saturday, 8 February 2020

Ninh Binh - Tam Coc - Vietnam

Tam Coc is on the Red River Delta in North Vietnam.
It's part of the province of Ninh Binh.


Very beautiful and unspoilt.

There is a flooded cave system; and lots of mountain pagodas.


I was only there for 1 day. Hardly enough time to explore.

Take a boat up the river.

The geology of the cave/ mountain system is very similar to what you will see in Ha Long Bay
except its inland.

One of the coolest things is to watch how people row the boats .... with their feet.
So definitely  take the two-hour sampan-ride.


The film Indochine made this place famous.

The Sampan ride takes you down a meandering river .. you will see lots of rice paddys and mountains, and pass through 3 flooded caves.


----------------------------------------------------------------------------------------------
For more travel postcards click here

Friday, 7 February 2020

Isomorphic Keyboards - Deluge etc

This post is mostly centered around the Synstrom Deluge's isometric keyboard, however the info can be applied to the many other iso - keyboards out there.. both of the software & the hardware variety.
So what's an Isomorphic Keyboard?
There are lots of different varieties. You can find them on devices like the Deluge, the Novation Launchpad, the Linninstrument, Native Instruments Maschine, AKAI's Force, Geoshred (ipad), the Abelton Push controller and Korg's SQ-64 sequencer. These instruments have square keys.


The keys can also have different shapes. Devices like the Hyve Synth and the Axis controllers by C-Thru Music, use hexagonal keys.  


Accordions using round and hexagonal keys in various isomorphic layouts have been built since the 19th century. So the idea isn't new.


The word isomorphic derives from the Greek iso, meaning "equal," and morphosis, meaning "to form" or "to shape."
Your standard keyboard looks like this:

The iosmorphic keyboard, in comparison, has the notes of a standard keyboard but they are arranged differently.


Moving left to right horizontally, the lit keys  are A, B, C, D , E , F, G.
The unlit keys are your sharps / flats : A#/B-flat, C#/D-flat, D#/E-flat, etc etc
That is, each key is 1 semitone apart from the next. ... pretty much like a standard keyboard.

However, differences appear when we move in a vertical direction
If we move up or down the isometric keyboard, each key is 5 semitones or a perfect 4th from the next.
For example moving from A to D on a normal keyboard looks like this:

But on an isometric keyboard, it's just one button away.

This setup on the Synthstrom Deluge is called a ‘chromatic fourths’ arrangement.
It's a bit like a fretted string instrument such as a guitar.


Notice also that each note appears more than once on the isometric keyboard.

The advantage of this layout comes when you try to learn chords.
When you play a chord on a standard keyboard you need to learn many finger positions.
Every chord has a unique finger configuration. Eg if you wish to learn the major chords you have to learn 12 different variations, for each root note.

On an isometric keyboard, you only have to learn one shape or pattern for each chord. Then you just apply that to other notes.

For example a Major chord is a triangle.
So a C major chord (CEG) will look like this:

A D major chord (D,F#,A)


An E Major Chord ( E, G#, B)

 Here are some basic Chromatic Isomorphic keyboard shapes to remember.


The video below shows how after pressing the scale button all you see are the root notes.


In this case the root note is C.
When you press any C note, all the other C notes light up.

The Deluge by default  ships with its keyboard set to a C major scale
The video below shows how to change the root note.


In this case its from C to G
1. press the Scale button.
    (you will see only the C notes lit up)
2. Hold down the Scale button &  Press the note you wish the root to be (G in this case).
    So now we have a keyboard set up with a  G major scale.

To change the scale type press shift + scale
Thus you can cycle through some common types:
As of writing the available scales are:
Major
Minor
Dorian
Phrygian
Lydian
Mixolydian
Locrian
Melodic Minor
Harmonic Minor
Hungarian Minor
Marva ( Indian Raga scale)
Arabian
Whole tone
Blues
Pentatonic Minor
Hirajoshi (Japan)

Music Intervals
An interval in music is the measured distance in pitch between two notes. It defines the space between sounds, either played sequentially (melodic interval) or simultaneously (harmonic interval). Intervals are the building blocks of melodies, scales, and chords, classified by number (e.g., third, fifth) and quality (e.g., major, minor, perfect).

Key Aspects of Musical Intervals:
Melodic vs. Harmonic: Melodic intervals occur when notes are played one after another, while harmonic intervals occur when two notes sound at the same time.

Measurement: They are measured by counting the steps between notes, including the starting and ending notes (e.g., C to E is a third: C-D-E).

Quality: Intervals are further defined by their quality—perfect, major, minor, augmented, or diminished—which describes the exact number of semitones between the notes

Some Basic Interval Patterns to play around with using left/right hands:

Unison (Two notes of the same pitch)
Octave (The distance between a note and the next note with the same name)
Major Seventh. (11 semitones.  Eg: C to B, F to E, D to C#)
Minor Seventh. (10 semitones. Eg., C–B#)


Minor sixth (8 semitones eg; C to A flat, A to F)
Major Sixth (9 semitones. Eg C to A)
Perfect fifth (7 semitones. Eg C to G).


Tritone (3 whole tones or 6 semi tones. F to B or C to F#).... the devil in music.
Perfect Fourth (5 semitones. Eg C - F, G–C, D–G, A–D, E–A).
Major Third (4 semitones eg C-E)
Minor Third (3 semitones. A to C, E to G, C to Eflat)
Minor Second (one semitone) E-F, F-F#)
Major second (2 semitones eg C-D)


We can now combine the basic intervals to form triads

Triads
Triads are three-note chords formed by stacking musical intervals. 
The foundation of a triad consists of a root note, a third above the root, and a fifth above the root. The specific type or quality of the triad (major, minor, diminished, or augmented) is determined by the specific sizes of these intervals.

Here is how different intervals form the four main types of triads:

1. The Core Structure: Stacked Thirds
    Triads are built using thirds. They are made up of:
+ Root: The foundation pitch.
+ Third: Located a third above the root.
+ Fifth: Located a third above the third (which is a fifth above the root).

There are 4 types of triads:
Major, minor, augmented, diminished (& sus chords)


Major chord
comprises : Major, 3rd, 5th

The minor chord 
The primary difference between major and minor chords is the third note of the chord, which is lowered by a half-step in minor chords to create a darker, sadder, or more intense sound compared to the bright, happy sound of major chords. Major chords consist of the 1st, 3rd, and 5th notes of a scale, while minor chords use the 1st, flat 3rd, and 5th.


Augmented chord
An augmented chord is a three-note triad (1-3-#5)
formed by stacking two major thirds, resulting in a major chord with a raised fifth, 
such as C-E-G#

Diminished Chord
A diminished chord consists of two stacked minor thirds (root,M3 A5) 
creating a dark, "scary" sound that resolves to a minor chord.
(minor 3rd with diminished 5th)
In comparison, An augmented chord has two stacked major thirds , 
 creating a bright, "dreamy" or suspended sound that resolves to a major chord


Suspended (Sus) chord
A suspended (sus) chord is generally considered a three-note chord (triad), but it is not a traditional major or minor triad because it lacks a 3rd. Instead, the 3rd is replaced by a major 2nd (sus2) or a perfect 4th (sus4), creating a, 2, 5 or 1, 4, 5 structure.

Types:
Sus2: Root - 2nd - 5th (e.g., C-D-G)
Sus4: Root - 4th - 5th (e.g., C-F-G)

Structure: They consist of a (Root), (2nd or 4th), and a (5th).
The third is replaced by a dissonant tone to add tension and dissonance.


---------------------------------------------
Note:
This post covers the deluge with firmware V3.0 (2020)
(post updated 2026 Chopin firmware)
-------------------------------------------------------

Links
* Wicki-Hayden Note Layout
* Axis 49 keyboard
* Hyve Synth
* Linn Instrument 
* XotoPad for Windows multi-touch devices.
* Geoshred

NLC Motherload for 2020

This should keep me out of mischief during 2020
Andrew was pretty busy with new modules last year.


 Mobius PiLL
Dual LFO/VCO
1U Signum
VCAs
Beat Freq
1U 6HP Difference Rectifier
Cellular Automata
1U Sloth Chaos
Dispersion Delay
DelayNoMore 3
Bi-di Choppers
I can't believe it's not a VCO

Some NLC words of wisdom:


NLC Dispersion Delay - build notes -part 1

These are my build notes for the nonlinear circuits Dispersion Delay


Its a eurorack format module.


Some pics of the virgin PCBs and panel.


This module is based on ideas suggested by Lucas Abela. It is three vactrol based bandpass filters in parallel, each filter is fed into a voltage controlled delay stage. The outputs are available individually or there is an OUT ALL where all 3 signals are mixed.


--------------------------------------
Before beginning, three 100k and three 47k resistors should be replaced with 220k.

 ------------------


 + Integrated circuits - packaging 


The delay chip


tHE voltage regulator


This module uses 9 vactrols.
You can make your own if you like.
Try to choose ones with low on & off resistances.

---------------------------
Andrew's notes; "If the datasheet for your chosen vactrol or LDR shows the minimum resistance as more than 1kΩ, then you can replace the 470R* on the PCB with a link or much lower valued resistor, say 10Ω.
.If none of this makes any sense, just install 470R.(R = Ω"

I'm installing 470R.

I'm also installing 470R for the LEDs (RL)

I decided to try rolling my own vactrols ... just for fun.
There are 9 of them to do.
testing shrinkwrap first.
Of course if you have a 3D printer then make your own light tight boxes.

Im inserting the LED side in first.
remember that the short lead is the cathode. = K
 The yellow shrink wrap is to prevent shorts.


---------------------------------------
to be continued................. 
Part 2 is here